
If you have an active HostGator hosting plan, you might have exceeded the Hostgator inodes limit for files in your unlimited hosting account. In hosting, the term unlimited means that there is no limit in terms of storage. However, with many hosts (including HostGator), there is a hard usage limit placed on inodes.
The term “unlimited” disk is usually the marketing technique to invite more users to buy the hosting. Sometimes, live chat support isn’t the best place to go as you will never get the “accurate” answer that you are looking for.

In my experience as a developer, I had the same problem with my clients’ websites. The inodes limit is usually exceeded too fast in HostGator. If you are facing the same problem, this guide is for you.
We will see how you can decrease inode counts and we will also see a better solution you can use.
What is Inodes in HostGator?
Inodes are nothing but files, folders, or any other system file stored in your server. This also includes your emails and trash files. So, if you have 10 folders, 100 files, and 2 emails in your inbox, you will be using 112 inodes.
HostGator has a limit on how many inodes you can use. There are two types of limits here.
- Soft limit: Soft limit comes at 100,000 inodes. When you cross the limit, you can still add more folders and files. However, your website won’t be included in automated backups.
- Hard limit: It comes at 250,000 inodes. This is where your account will be flagged and will lead to further review.
So, you should always have less than 250k inodes. Exceeding the hard limit might also result in suspension. We will talk more about it later. Let’s first see how you can check the inode usage.
How do I check my inodes on Hostgator?
HostGator makes it easier to check the inodes usage.
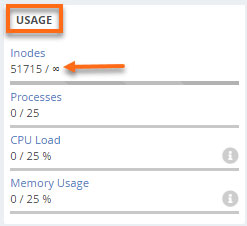
You can simply log in to your cPanel and see the inodes usage directly there. You will find it in the server statistic (right panel). This is the easiest way to check the inodes usage.
What happens if I exceed my HostGator inodes limit?
Now comes the section for which you might be waiting. You might have many questions by now. What happens if I exceed my inodes limit? Will HostGator suspend my hosting if I exceed my inodes limit?
Well, your account isn’t directly suspended but it will surely affect your workflow. Let’s learn more about it.
Site Status
Your website might go down or take a lot of time to load. More importantly, you won’t be able to upload new files or create new folders.
If there is any plugin that needs to create a new file might also misbehave. So, there will be many similar issues in the workflow.
Emails
You might stop receiving new emails. As we have discussed, even emails count as inodes. So, if the inodes usage exceeds, there will be no new emails in your inbox. If you are a business, you might lose very important business emails here.
So, it’s always better to decrease the inode count if it has exceeded. Even if you are not a business, it’s always a wise decision to decrease inodes count in HostGator, the next point will tell you why.
Account Suspension
HostGator will send you a warning message if you have exceeded the inodes usage count. When you get the email, you need to decrease the inodes usage. If no action is taken, it will lead to account suspension.

How Do I Find Where the High Inode Usage is at?
So, if your inodes count is high, you might want to decrease it. The first step to decrease inodes count would be to check the highest inode usage.
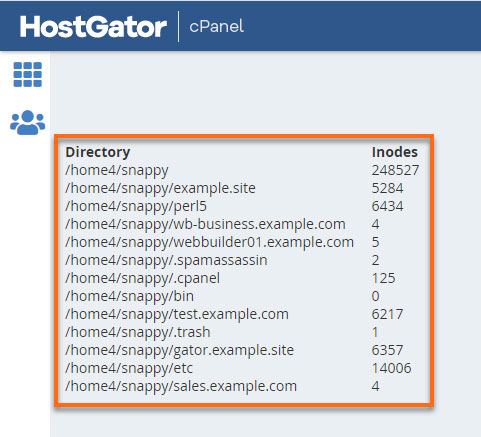
For that, HostGator has a dedicated page where you can find the total inode usage of each directory.
You can directly head over to the inode usage in the right panel and then click on “Inodes”. This will take you to another page where you can see the inode counts by directories. This is how you can find out which folder uses most of the inodes.
The next step would be to delete the useless files, right? Let’s learn more about it.
How to reduce inodes in HostGator?
We will see 9 easy steps you can use to delete all the useless files you want and decrease inodes in HostGator.
Step 1 – Delete Unused Plugins or Themes
At first, you will have to delete all the useless plugins and themes that you don’t need. So, you can head over to your plugins and themes directory to find out which are the plugins that you are no longer using.
Here is a small mistake that people often make. They just deactivate the plugin/theme. This won’t decrease the inodes. Instead, you will have to delete them. So, even if your website has a lot of deactivated plugins, you can delete them to free up some space for inodes.
Step 2 – Delete cache
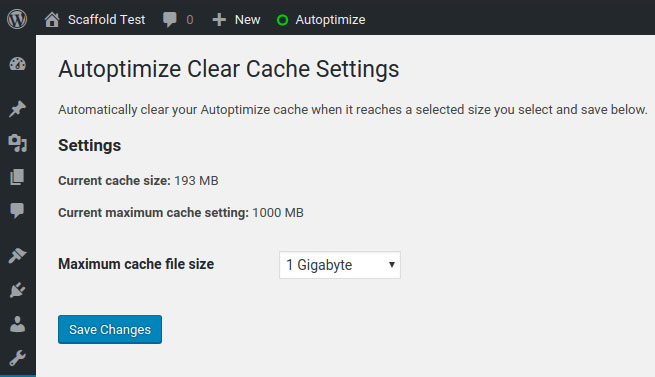
The next step is to delete cache files. If you have any cache plugin, be it SiteGround SG Site Optimizer or Autoptimize, they store the cache files in the server. You can try deleting them.
You can also install “Autoclear Autoptimize cache”. It’s a plugin that will help you clear Autoptimize cache automatically.
Step 3 – Delete Backups
The next step that you would want to take is to delete old backups that you have in the files. If you are using a plugin to take the backup, you might have a lot of backups there. Some plugins don’t delete old backup files. So, it’s always useful to delete the files manually.
Further, you can also change the settings in the plugins so that only a limited number of backups are stored.
You can also check Softaculous backups. It’s good to have up to 3 backups. Having more old backups will start causing problems.
What if you need some backups?
The first thing you need to do here is to compress the backups. If you only have one zip file in the server, it will only be considered one inode.
So, it’s always best to compress the files. Lastly, you can always use cloud backups through plugins like Updraft Plus.
Step 4 – Clean your Media Library
We all have a lot of images in our blog that we might not even be using. For instance, if you have uploaded one image and later replaced that image with another one, you might not have deleted the old image.
Don’t worry, you don’t need to clean it manually if you are using WordPress. There are two simple ways to clean it.
Media Cleaner
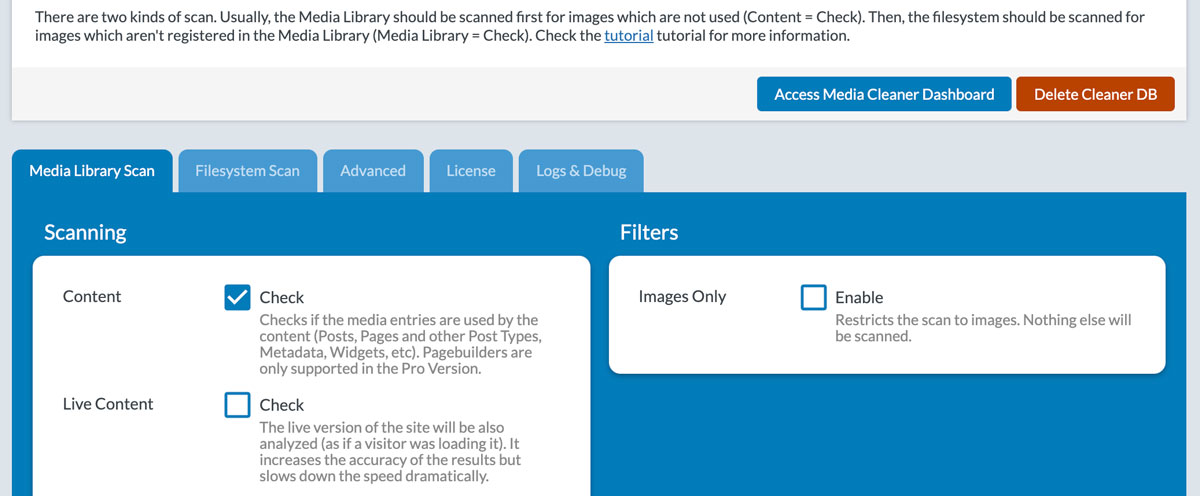
The best way would be to use the Media Cleaner plugin. It’s available for the WordPress website. You can install the plugin and run it. The options are self-explanatory.
You can first check all the content where images are unused and then you can select the images that you want to delete.
You can also select all the unused images with one click. The last step is where the plugin will delete all the selected images. It’s a free plugin and you can get it from the WordPress plugin directory.
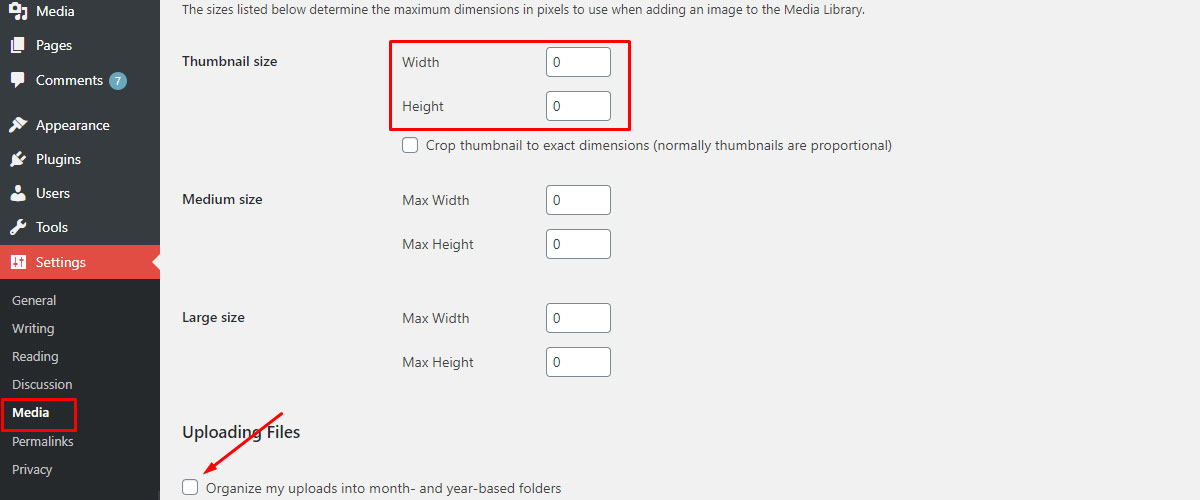
Disable WordPress Thumbnail Creation
WordPress creates a lot of thumbnails for all the images uploaded. This is to ensure the performance of the images when the user is using a different device. It’s safe to disable the thumbnail creation.
For that, you will have to head over to Settings > Media and set “0” as the value in every field. You can also uncheck the option where it asks to organize the images into month/year-based folders. This will simply increase the folders.
Step 6 – Remove Temporary Files and Trash Files
Many temporary files can be removed. You can first check the temp folder in your file manager. Thereafter, you can contact the hosting support as some temporary files are not directly visible to you.
In the same way, you can also empty your trash bin. Trash will also consume inodes as it’s still in your HostGator server.
Step 7 – Clean Emails
A simple yet very complicated task. Cleaning emails is a piece of cake. However, you might not be doing it right.
You don’t have to clean inbox emails but you also need to clean the sent emails, drafts, spam folders, and even trash. All these emails are occupying your inodes. So, it’s always better to clean it.
Step 8 – Sweep your file manager
It’s time to clean your file manager now.
We will begin with the core files. The old WordPress installation might have a lot of useless files in it. So, it’s always better to install a fresh WordPress installation. You can replace the core files or you can simply update them. The fresh installation contains roughly 5000 inodes.
The next step is to clean the staging and development websites. Many people might have created the staging environment while they were developing the website but forgot to remove them.
Step 9 – Delete long directories
The last step might not apply to all. If you have any custom files and folders, it’s better to delete them. Also, if you have any hierarchy of folders that can be zipped, you should zip those files and make them a single file.
Alternative to HostGator
If you still can’t delete HostGator inodes, you can always look for alternatives. Few hosting providers don’t keep a track of inodes. Here, you are only limited to the physical file system (such as storage). The hosting companies that use KVM or LXD don’t have inode limits. So, you can look for the hosting providers that use KVM or LXD for virtualization.
Kinsta uses an advanced ZFS file system where there is no inodes limit. So, you can always use Kinsta instead of HostGator.
The only limit that you have is the storage limit. This is recommended for people who own an online business, and have a lot of files and folders in their hosting account. You can use Kinsta in that case.
Final Verdict
For most bloggers, the inodes limit won’t be an issue. You might have exhausted the limit for the short term but if it will probably be solved once you follow all the above steps.
However, if you are still facing issues, you can check out Dreamhost.
Dreamhost allows you to host as many files as you want. It will cost you a bit extra compared to HostGator. With this price, you will also get no inodes limit and Dreamhost is better overall as compared to HostGator.
If you have got the budget, you can always go with other premium hosts like Kinsta, WPX, and WP Engine.
For some perspective, my private WordPress blog has roughly 200 posts. It occupies 25,000 Inodes. This is because I use some plugins to increase the functionality. Usually, a basic WordPress installation with a handful of posts, plugins, and themes uses up to around 9,000 Inodes.
Assuming, you have installed a few more plugins and have more images in the blogs, it can go up to around 50k inodes.
If you have multiple websites, HostGator’s inode limit will easily be crossed which might lead to account suspension too. Therefore, in this case, you can go with Dreamhost or other premium hosts.
FAQ
📌 Do backups and emails count as inodes?
Yes, backups and emails count as inodes. If your inodes are full, your website won’t be included in the automatic backup.
📌 What causes Inode error?
Inode errors can occur if you delete large files in your hosting regularly. When the inodes limit is exceeded, it might also show an error. In some cases, if the file system is damaged, it will show an inode error (it’s rare).
📌 Why do the majority of hosting providers impose an inode limitation?
In shared hosting, the resources of the server are shared with multiple users. The software uses resources to send and locate the data in the large indexing.
Therefore, there is an inode limitation that limits the number of files and folders each user can have. As there is a limit on inode usage, it’s easier for the software to index and load the data as required.
If there is no limit, there will be long-term issues as well as performance issues. A few hosting providers use better software or KVM/LXD, this removes the inode limit. Also, if the provider only has a few servers (which isn’t possible as they will have to scale), it will not cause inodes problems.
Web Hosting Expert, Content Writer, SEO Consultant, and Web Developer with over 10 Years of Experience.
He has a passion for technology and has spent over a decade reviewing and testing web hosting companies to provide his readers with honest and accurate reviews of the companies he had experiences with.
Tommy loves helping people and has helped hundreds of people start their own successful sites.