Are you experiencing certain issues with your hosting because your inodes have exceeded the limit?
Well, if you are unable to upload new data to your Hostinger account or your website performance has declined recently and you are searching for the Hostinger inode limit, then you are at the right place.
This article covers everything about the Hostinger inode limit from its meaning to its impact on your website performance, and lastly how you can solve this issue.
So let’s find out.
What are inodes Hostinger?
Inodes are the data structures that store all the information of your website files. So Hostinger inodes contain the information of all the files you have created on your Hostinger hosting account.
Whenever you upload or create a new file, a data structure corresponding to that file is created on the Hostinger server in the form of an inode. These Hostinger inodes store all the server file information including the file user, file type, the permission of access, and more.
An inode number identifies each of your website files in the file system maintained by the webserver. So, the total number of inodes will represent the total files uploaded and created in your Hostinger account.
All individual elements like:
- Files, folders
- Emails, and their attachments
- Videos, images (all sort of media)
- HTML + all Script files
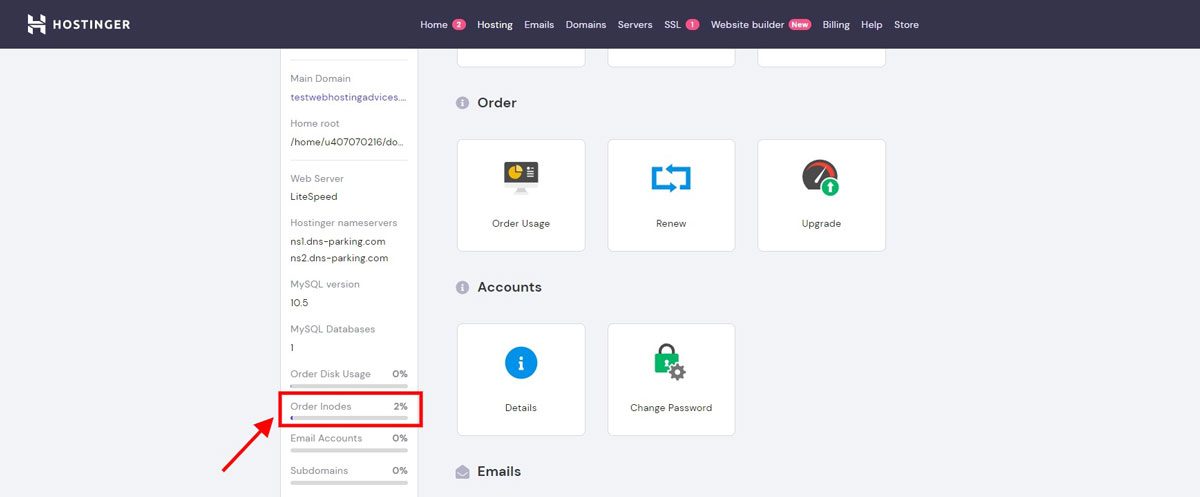
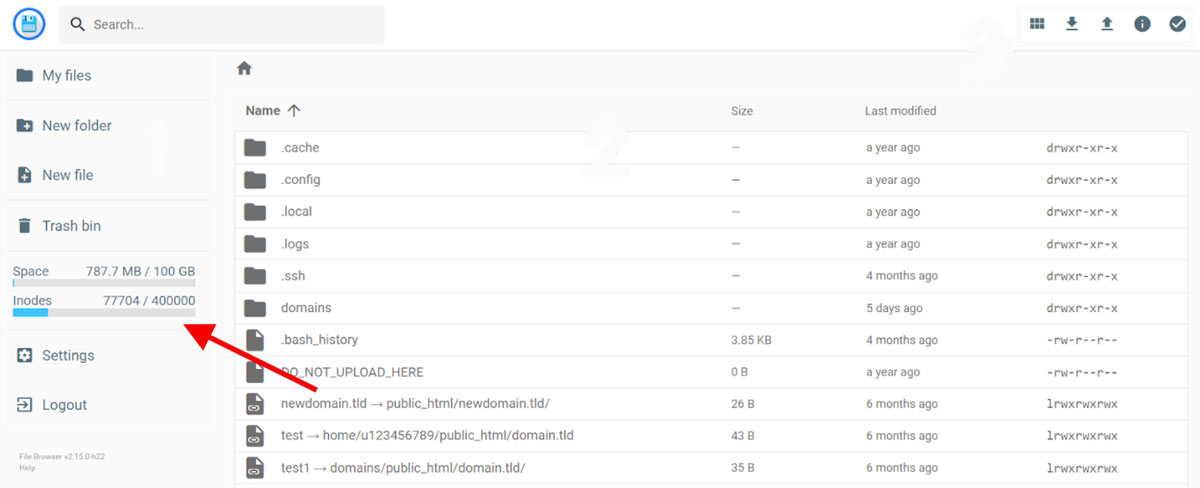
You can find inodes in your Hostinger account by following this route:
Hosting → Manage → File Manager (beta)
This is how it will look like:
How do you remove inodes from Hostinger? (9 Steps)
Every hosting provider sets an inode limit to its hosting plans. Even when you buy a hosting plan with unlimited resources, the host will generally set an inode limit to the plan.
For medium-sized websites, inode limits available with unlimited hosting plans will usually be sufficient for your storage needs. For a small website, even a hosting plan with the lowest inode limit might also meet your storage requirements.
But the major problem arises in the case of large websites or when you run multiple websites from your Hostinger hosting account. In such a case, you must remove inodes from Hostinger for better performance of your website. Let’s find out how to remove them here:
Step 1. Find the source of the problem
First thing, you want to uncover which folder or file in your hosting account is consuming the highest amount of inodes.
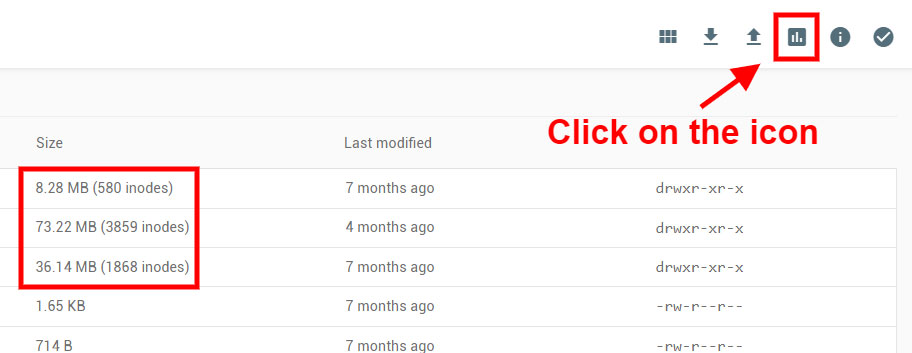
To do that, all you have to do is go to your “File Manager”, and once there, click on the top-right icon as shown below:
This will help you show the size of inodes for each folder you have. Once you spot the directory with the highest number of inodes, access it and repeat the procedure by clicking on the same icon again, and keep going in the same way until you land on the final directory that holds all the files responsible for this issue.
Doing this will help you determine the source of the problem.
Step 2. Delete unnecessary image files
Your website’s WordPress settings and active theme create multiple versions of every image you upload to your hosting account. These versions feature different stylings and some themes create up to 12 different versions of a single image you upload. The majority of themes will, however, save your image files in these 4 versions:
- Original image
- Thumbnail of the original image
- Medium-sized image
- Large-sized image
All these different image versions make separate inodes thereby contributing to your inode limit. So you must delete the unnecessary image files that you do not intend to use including the additional versions created by your website’s theme.
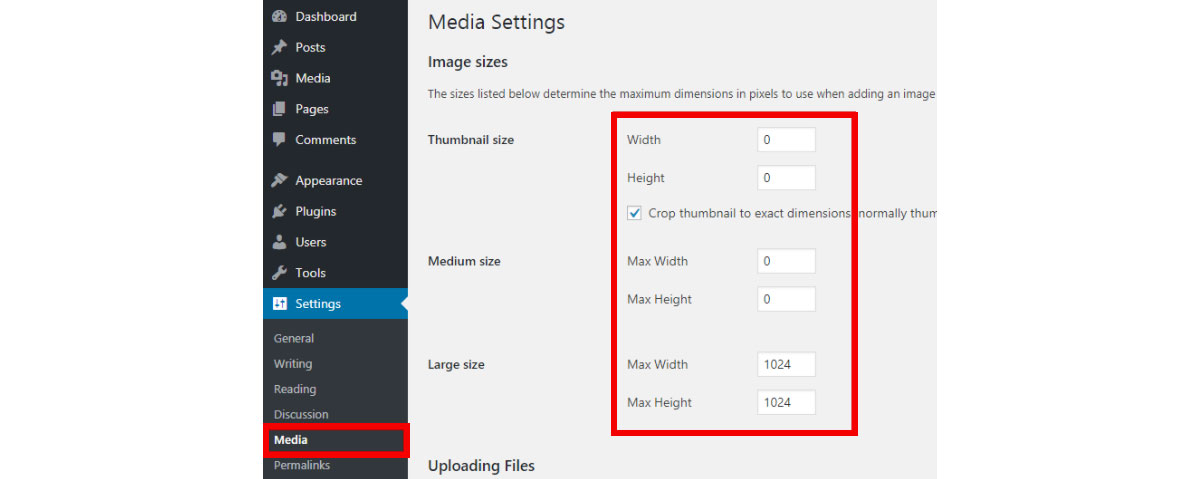
You can also prevent your theme from creating image versions you don’t require in the future. Just set the height and width of these variations to zero in your “Media” settings.
If you need only the large-sized version of your images, you can set the dimensions of other versions as shown in the screenshot below:
Step 3. Delete deactivated themes
All website themes consume a part of your inode limit depending on the features it offers. A theme with more features will use up more inodes and vice-versa.
Even a deactivated theme in your Hostinger account uses inodes since its files are stored on your website’s server. So, you must delete all the themes that you are not currently using to remove inodes from Hostinger.
You will find all the active and inactive themes under the Appearance tab:
Step 4. Delete unused plugins
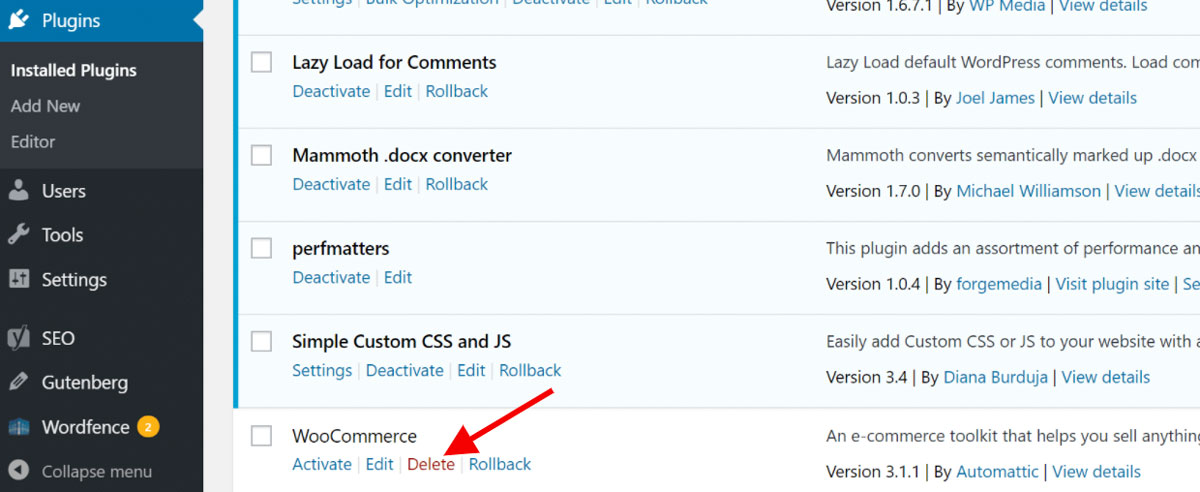
Just like website themes, plugins also contribute to increasing your Hostinger inodes. The number of files contained in a plugin decides the number of inodes it will consume. So you must delete all the disabled and unused plugins from your account to reduce your inode count.
You will find the delete button just below the plugin name as shown here:
Step 5. Clean your emails
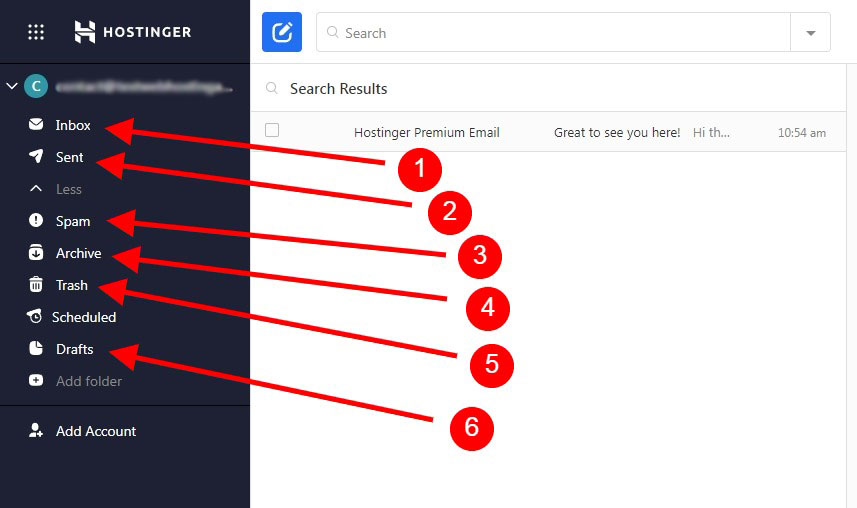
If you have never cleaned emails in your Hostinger account, there are high chances that they are occupying a significant number of inodes. All messages in your inbox, the sent folder, and even the spam folder contribute towards the inode count since these are stored as files on the Hostinger’s server.
So if you have an unused email account that you haven’t checked for years, you must immediately delete it.
- You might have received hundreds of spam emails occupying an equal number of Hostinger inodes.
- You must also clear the sent folder of your email account that you use for marketing campaigns. With time, it will add up to thousands of inodes or even more, depending on the number of your website subscribers.
- Ensure deleting the emails you no longer require from your inbox and clearing your spam folder from time to time.
You can also consider saving your emails to your local device periodically and bringing down your Hostinger inode number substantially.
Step 6. Remove temporary files
Temporary files or TMP files are created on your server to temporarily store information needed by other applications you use. These files also consume your inode limit and often reside on your server long after serving their purpose.
So you must periodically delete the temporary files that are no longer required by any other applications.
Step 7. Removing log files
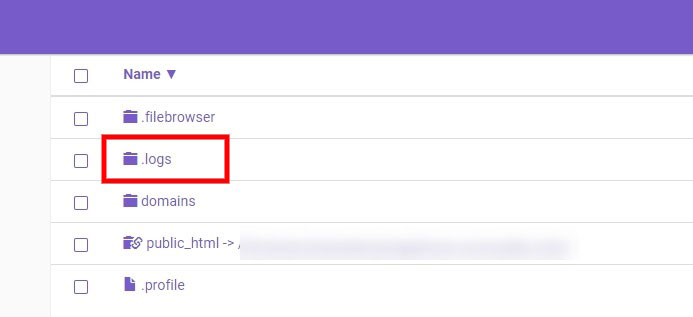
The log files on your Hostinger account record all the past activities that took place on the server. Depending on the type of applications installed on your server, your account might have just a dozen or hundreds of log files.
All these files will have their corresponding inodes as well. So you must download these files to your computer if you believe they are useful and remove them from your Hostinger account to bring down your inode usage.
You will find your log files in the File Manager here:
Step 8. Clear the trash
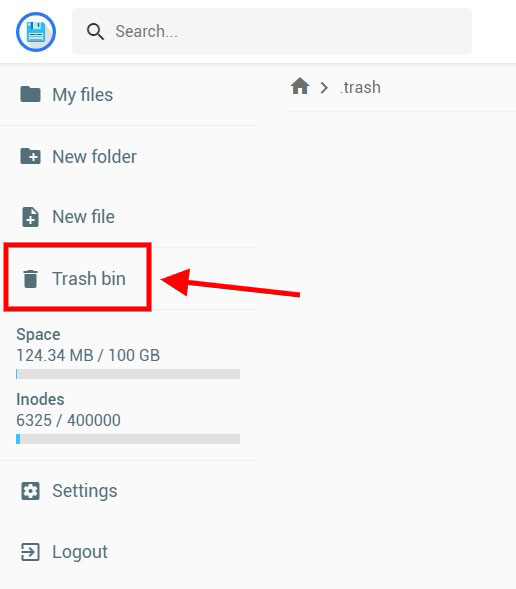
All the files, folders, images, posts, comments, and other stuff that you delete from your Hostinger account go into the trash folder. All these trash files also contribute to your inode number. You must delete these files permanently and clear the trash folder to remove the inode from Hostinger.
The trash folder can be found at the File Manager (beta).
Step 9. Delete caching files
Your server creates cache files to quickly load your website at your visitors’ end. Copies of your website data are created during the process thereby increasing your inode count. You can either delete your cache files manually or utilize a caching plugin like WP Rocket or W3 Total Cache to automatically clear away the cache files. But do not forget that these plugins will add to your inode count.
Step 10. Removing extra backups
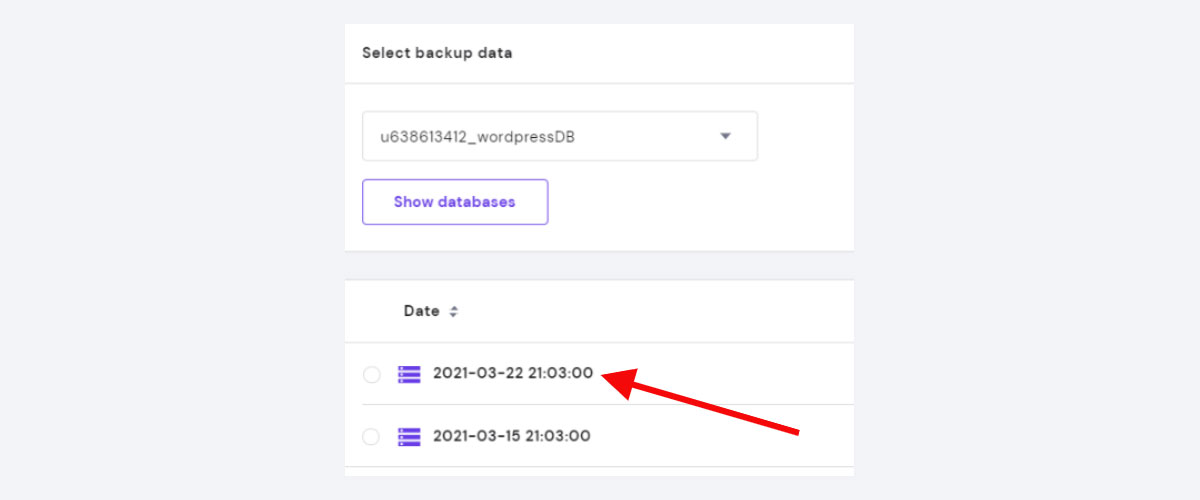
If your Hostinger account contains multiple backups of your website, it is consuming a lot of your inode limit. You must, therefore, remove the extra backups that you do not require to bring down your inode count.
You can delete all the backups leaving only the latest one. For instance, the screenshot below shows two database backups with the date of their creation. Choose to keep the one with the latest date and delete the other in such a case.
What happens if you reach the Hostinger inode limit?
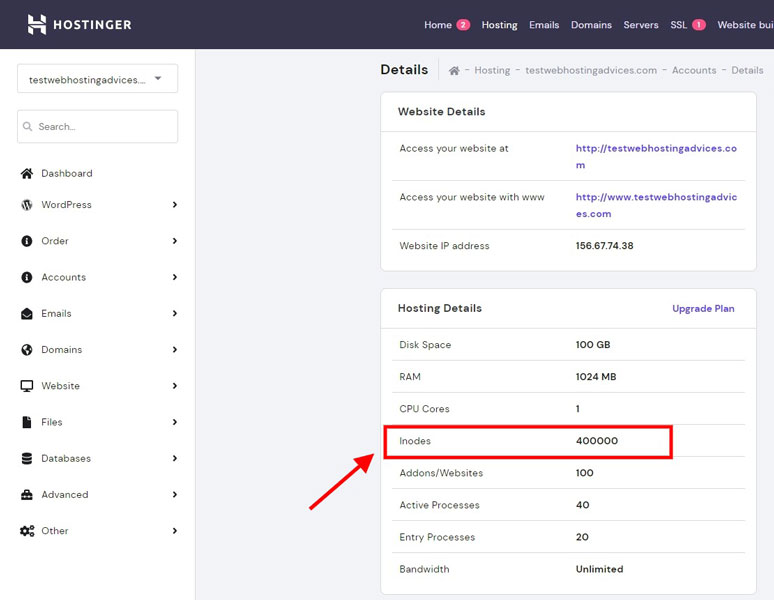
Hostinger offers a lot of inodes with all its hosting plans. You will get 200,000 inodes even with its smallest plan. But if you still reach the Hostinger inode limit, you will experience this:
- You won’t be able to add any new files or folders to your server.
- Hostinger will stop making automatic backups of your website.
- Your mailing service will not function properly.
- Your website will stop working properly and might even crash if the inode limit is exceeded to a large extent.
- The host might also suspend your account until you reduce your inode count to meet the Hostinger inode limit.
How to increase inodes in Hostinger?
Now that you know the importance of inodes in your Hostinger hosting account, you must aim for increasing them to improve your website performance. It is recommended to first remove inodes by following all the ways discussed above.
If you still find that you reached your Hostinger inode limit even after removing all the unnecessary stuff from your hosting account, you can go for these options:
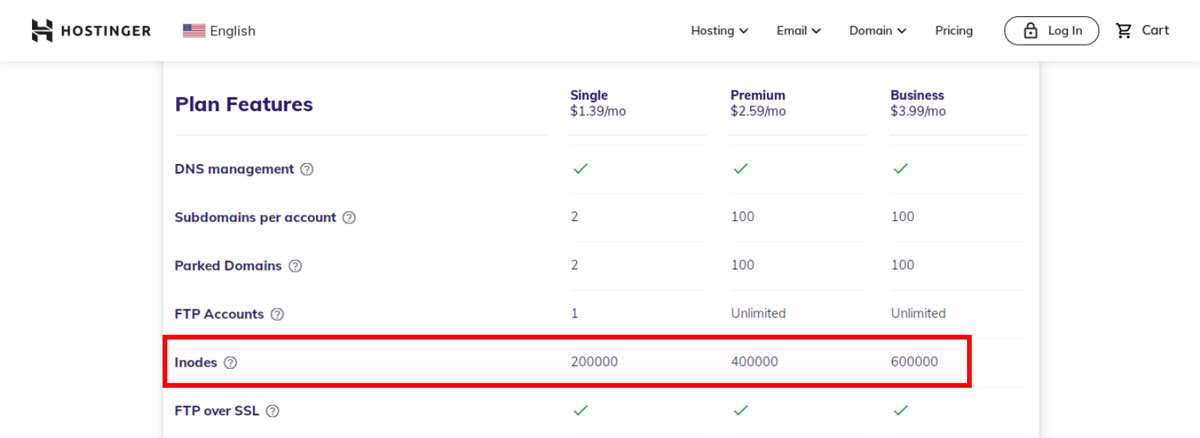
Upgrade to a higher Hostinger plan for receiving additional inodes in your account. Hostinger offers 200,000 inodes with its smallest shared hosting plan called “Single”.
Its Premium and Business shared hosting plans offer 400,000 and 600,000 inodes respectively. So grabbing a higher shared hosting plan will give you additional 200,000 inodes.
Here’s a quick overview of Hostinger shared hosting plans, their inode limits, and the prices you will be paying for them:
| Shared Hosting Plans | Best Price Available | Inode Limits |
|---|---|---|
| Single | $1.39 per month | 200,000 |
| Premium | $2.59 per month | 400,000 |
| Business | $3.99 per month | 600,000 |
2. Moving to other hosting types
The resources offered by shared hosting services are generally sufficient only for small websites.
If your website has a larger storage requirement than what is offered by the biggest shared hosting plan from Hostinger, you can consider moving your website to some other type of hosting. Hostinger offers VPS (Virtual Private Server) and Cloud hosting plans with higher inode limits than its shared hosting plans.
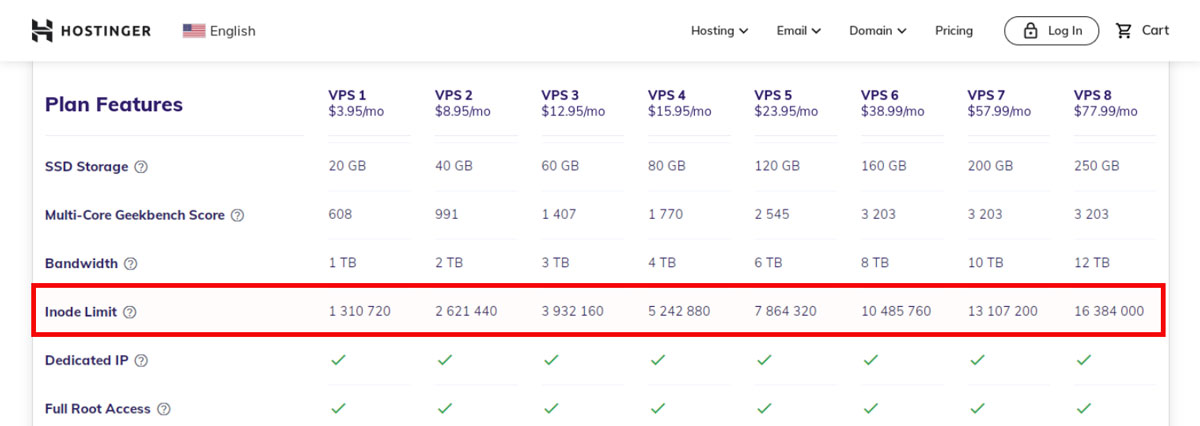
Moving your website to these hosting types will get you 10X times more Hostinger inodes than what is offered by the shared hosting plans. Here is a quick overview of the number of inodes available under these plans along with their pricing structure:
Hostinger offers 8 VPS plans with the following inode limits and pricing structure:
| VPS Plan | Best Price Available | Inode Limits |
|---|---|---|
| VPS 1 | $3.95 per month | 1,310,720 |
| VPS 2 | $8.95 per month | 2,621,440 |
| VPS 3 | $12.95 per month | 3,932,160 |
| VPS 4 | $15.95 per month | 5,242,880 |
| VPS 5 | $23.95 per month | 7,864,320 |
| VPS 6 | $38.99 per month | 10,485,760 |
| VPS 7 | $57.99 per month | 13,107,200 |
| VPS 8 | $77.99 per month | 16,384,000 |
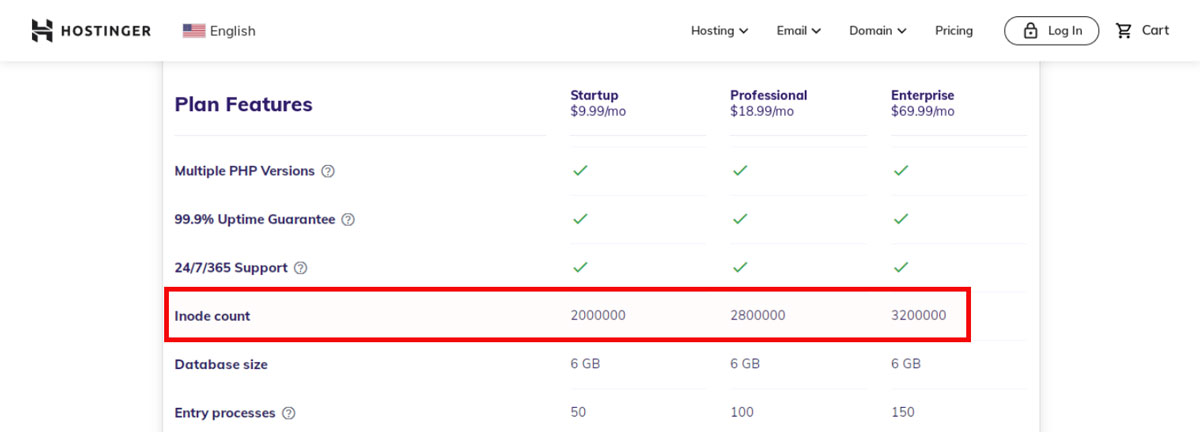
Additionally, you will find 3 Cloud hosting plans offered by Hostinger having the following inode limits and pricing structure:
| Cloud Hosting Plans | Best Price Available | Inode Limits |
|---|---|---|
| Startup | $9.99 per month | 2,000,000 |
| Professional | $18.99 per month | 2,800,000 |
| Enterprise | $69.99 per month | 3,200,000 |
3. Moving to another hosting provider
Hostinger offers a high number of inodes with its VPS plans but you are still bound by the upper limit of inodes available in your Hostinger account. So if you are running multiple websites that are growing and, thus, require more storage; you must consider moving your website to a hosting provider offering unlimited inodes like DreamHost.
With the availability of unlimited inodes in your hosting account, you will no longer have to worry about this limitation problem anymore. Not to forget that your website performance won’t decline because you will reach your inode limit since there is not any limit at all!
Conclusion
All your website data is stored in the form of Hostinger inodes that are limited with each hosting plan offered by the company. The smooth functioning of your website greatly depends on your inode usage.
If you are doing all the efforts to keep your inode count to the minimum but your website is still hitting the inode limit repeatedly, then it is a sign of your website outgrowing the hosting plan you are currently at.
Understand the growing needs of your website in such a case and move it to a better hosting environment that can provide the necessary resources for its smooth functioning.




Hi,
How to reduce Inods from Hostinger Cpanel?
Hi Ashok,
You can go to the “File Manager”, and once inside, try to locate which directory has the biggest size and inodes.
You can find that out by clicking on the icon on the top right (it looks like the statistics icon), and that will reveal to you the inodes sizes for each folder.
This will help you corner the source of the problem.
Please try this and keep me updated 🙂
Hi,
We don’t find any statistics icon in top Right in file manager.
Please send the screenshot if possible.
Thanks,
Ashok
I updated this tutorial with the proper screenshot, it’s located in Step-1
VERY USEFULL
Thank you for your comment 🙂 I’m glad it was helpful to you!